Broker FAQs
Process FAQs
Process
How do I add a new user?
TriumphPay administrators have the ability to create new users and select their roles.
The menu is only available for user with administrative privileges. If you need to modified your account privileges, please contact your account administrator or TriumphPay Support.
1. Log in to your TriumphPay Broker profile with your username and password.
2. Go to My Profile, located under the top right user icon.
3. Select My Users tab, located at the top of the page.
4. Click on the Add User +, located at the upper right side of the screen, and complete the required information.
If you encounter any difficulty adding a new user or updating their roles, please submit a ticket to TriumphPay Support.
TriumphPay Audit Document Viewer Keyboard Shortcuts
You can find additional details on the Help page or by hovering over the icons on the document viewer.
For handling documents
| Action | Keyboard shortcuts |
| Mark POD | Alt+D or 0 (Number pad) |
| Mark page as illegible | Alt+T |
| Edit doctypes | Alt+E or * (Number pad) |
| Zoom in | Alt+= or + (Number pad) |
| Zoom out | Alt+- or – (Number pad) |
| Rotate page to the right | Right arrow key |
| Rotate page to the left | Left arrow key |
For navigating between documents and groups
| Action | Keyboard shortcuts |
| Skip to next page | PgDn or Alt+Shift+P |
| Skip to previous page | PgUp or Alt+P |
| Jump to next Group | Alt+G |
| Jump to previous Group | Alt+Shift+G |
What is the NOA or LOR submission process?
When submitting an NOA or LOR to TriumphPay, an email is sent to a personalized email address for your organization. This email address will be provided during the onboarding process.
Once the NOA or LOR is received, it is double processed by a dedicated team to ensure accuracy. The average timeframe for processing is two business days.
If there are discrepancies, the document is then reviewed by a Manager for final determination.
If you need to obtain the email address, or have any questions regarding the NOA/LOR process, please contact your Relationship Manager or submit a ticket to TriumphPay Support.
How do I set an invoice to Broker QuickPay?
TriumphPay administrators users can select to set invoices for Broker QuickPay within the TriumphPay Dashboard.
The menu is only available for users with administrative privileges. If you need to modify your account privileges, please contact your account administrator or TriumphPay Support.
1. Click on Invoices located in the left side navigation menu.
2. Locate and select the invoice that you would like to update.
3. Click on the Settings option.
4. Select Broker QuickPay from the drop-down menu.
For assistance with changes to Broker QuickPay, please contact TriumphPay Support.
How to Set Up Multi-Factor Authentication (MFA)
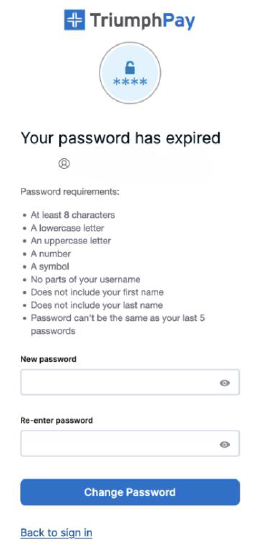
1. Log In to TriumphPay and Update Your Password (If Needed)
Navigate to your TriumphPay portal and enter your credentials. If necessary, update your password.
2. Select Your Authenticator
If you have not already enrolled in MFA, you will see a pop-up that says “Set Up Security Methods” the next time you log in to TriumphPay. There are three MFA methods and you only need to choose one:
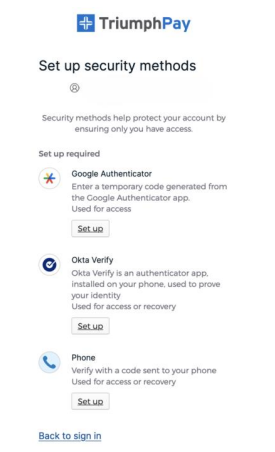
- Okta Verify: Download the OKTA app, select the + icon, select the organization and then scan the QR code provided in OKTA. It will now show up, and when you attempt to log in, the notification will be pushed to your device.
- Google Authenticator: To use this method, you will need to install the Google Authenticator app. The app does not send a code; you must open the app each time and type the code listed next to the option for TriumphPay. Setup is easy: simply hit the + icon in the authenticator app, select scan a QR code, and scan the code supplied by OKTA.
- Phone: After entering your phone number, you will be able to request a call code, or a text code after entering your phone number (no extensions). Enter the phone number, it will either call or text the user. The user will then need to enter that code to validate the MFA.
It is important to note that using MFA is a security benefit. However, it may clash with existing processes of multiple users using a single login. You will want to work with your account admin to ensure that all users have their access and set up their own MFA for their account.
3. Setting Up MFA Without a Smartphone
If you do not have a smartphone or prefer not to use one, there are several workarounds for setting up MFA:
Non-Smartphone Mobile Phone (Flip Phone)
Select Okta Verify as your Authenticator (see Step 1). Next, select Enter a Code or Phone your security verification method (see Step 2). These methods work with any mobile phone whether it’s a smartphone or not.
Landline Phone
Select Okta Verify as your Authenticator. Select Phone as your security verification method. Verification calls are made by an automated system, so please ensure that your landline phone receives calls directly and does not require an extension.
Tablet/iPad
Select Google Authenticator as your authenticator. Download the Google Authenticator app from the App Store or Google Play Store. This app generates unique, one-time verification codes without needing an active Wi-Fi or cellular connection.
Laptop or Desktop Computer
Select Google Authenticator as your authenticator. Next, you’ll need to use an online password manager with integrated authenticators, such as 1Password or Bitwarden. These tools offer a convenient way to generate one-time passwords for two-factor authentication.
TriumphPay Support
Who is my relationship manager?
Your TriumphPay Relationship Manager is assigned to you during the onboarding process.
If you are not sure who your TriumphPay Relationship Manager is and need assistance, please contact your Sales Engineer or submit a ticket to TriumphPay Support and we will facilitate the connection.
How can I contact TriumphPay?
For assistance, please contact TriumphPay Support, where a first response should be received within 8 business hours.
Business hours are Monday through Friday, 7am – 5pm Central Standard Time.
What are TriumphPay business hours?
TriumphPay is open Monday – Friday.
- 7:00 am – 5:00 pm Central Standard Time
- 8:00 am – 6:00 pm Eastern Standard Time
- 6:00 am – 4:00 pm Mountain Standard Time
- 5:00 am – 3:00 pm Pacific Standard Time
For assistance, please contact TriumphPay Support.
QuickPay Best Practices for Brokers
How can I find carriers who are in the Select Carrier program or frequently choose QuickPay in TriumphPay?
To download the carrier list in TriumphPay and filter by QuickPay term, follow these steps:
- Go to the “Carriers tab” section on the left of the page.
- Click “Export” to show QuickPay carriers you have a relationship
To download the select carrier list in TriumphPay and filter by QuickPay term, follow these steps:
- Browse below the dashboard to “Browse active Select Carriers”
- Look for the “Browse active Select Carriers export” report.
- Select Carriers have opted into a program where they take QuickPay by default from all brokers offering it within TriumphPay.
- Click the “Download” link to get an Excel spreadsheet with the list of active carriers in the program.
How can I encourage carrier sales representatives to engage with QuickPay and prioritize booking loads with QuickPay carriers? Additionally, how should I communicate the benefits of QuickPay to brokers?
- Carrier sales representatives typically handle the load booking for their carriers. While most broker sales reps don’t usually check if a carrier uses QuickPay, if a broker is aiming to increase their QuickPay adoption and revenue, this can have the most significant long-term impact on QuickPay growth.
- Carrier Sales representatives or whoever helps with the load booking process can use the carrier lists available in TriumphPay (see question above) or see the carrier’s existing payment term in TriumphPay directly from the TMS.
How can I ensure carrier payment term visibility in my TMS when possible?
To ensure carrier payment term visibility in your TMS, you can check if the TMS allows you to see the active carrier payment terms in systems like TriumphPay. You will also need to determine which carriers accept QuickPay (QP) and assign loads accordingly. We recommend reaching out to your TMS contact to add a filter that shows the active payment term from your carriers in TriumphPay. This may require custom work. You can also contact your TriumphPay sales engineer for assistance.
How can new carriers select a QuickPay payment term?
New carriers can utilize an onboarding system (RMIS/My Carrier Packet/Highway) to select a QuickPay payment term.
Leverage these video resources with your carriers:
QuickPay videos
- https://vimeo.com/884950870/785c12a4b6?share=copy
- https://vimeo.com/884950923/0781546700?share=copy
- https://vimeo.com/884950847/e3a70c2000?share=copy
- https://vimeo.com/884950831/b2bbfc4c97?share=copy
- https://vimeo.com/879461422/dfd98ffa50?share=copy
Return to Top
Can’t find what you’re looking for?
Self Service
Available 24/7
Access invoices, payment status, reports, submit paperwork, manage wallet and QuickPay preferences, etc.
Live Support
Business Hours: Mon. – Fri., 7am – 5pm Central Standard Time
Fast, friendly experts to support carriers and factors for invoice/load verifications, NOA verifications, payment statuses, account changes, plus more.